


In this article we will show you how to create a Windows XP Virtual Machine. What is a virtual machine you may ask?
One of our guest writers explains it in great detail in one of our previous articles titled Virtualization and its Uses in the Tech World:
A Virtual Machine is a piece of software which emulates (pretends), to be machine (computer) to do an abnormal task such as running Windows on a Macintosh computer for example, to occur via the trapping of computer instructions. It is quite literally a computer running ON a computer. One of the by-products of this is that the two systems can be entirely separated from each other, which allows a level of security that just can’t be matched.
Now, lets make your own XP Virtual Machine.
- To begin, download and install Free VMware player (you will need to fill out a few questions before download). This is what our virtual machine will be running inside of.
- Choose what size you would like your Virtual Machine hard drive size to be (this will take up real hard drive space). I have created several different sizes available for download (right click, save file as..). For testing purposes, the 4Gb is a good choice:
- Download the appropriate file based on which Windows XP you own (right click, save as..) and save it in the same folder that you saved the previous file in:
- For XP Pro: WindowsXPPro.vmx
- For XP Home: WindowsXPHome.vmx
- Insert your WindowsXP CD into your CD Rom.
- Run VMware player which you installed in the first step and click the “Open” button and find the .vmx file you downloaded. Windows Setup should now begin.
- To interact inside your virtual machine, double click on the Window or press CTRL+G. This will make anything you do with the mouse or keyboard work inside the Virtual Machine only and not the desktop you are currently using. To escape the Virtual Machine so you can control your regular desktop, press CTRL+ALT.
- Install WindowsXP as you normally would by following the prompts. When the installation finishes you will see your new Windows XP Virtual Machine Desktop.
- To quit the Virtual Machine, either shutdown the VM version of Windows XP as you do for your normal desktop, or simply close the VMWare Player.
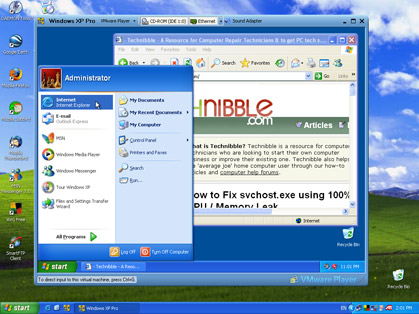
Window XP Virtual Machine. Windows XP being run from within Windows XPFor anyone who wants to experiment further with these Virtual Machines (for techies and geeks):
If you want to try this with other Windows operating systems such as Windows 2000. Open up the .vmx file with Notepad and it will look something like this:
config.version = “8″
virtualHW.version = “3″
ide0:0.present = “TRUE”
ide0:0.filename = “WindowsXPPro.vmdk”
memsize = “64″
MemAllowAutoScaleDown = “FALSE”
ide1:0.present = “TRUE”
ide1:0.fileName = “auto detect”
ide1:0.deviceType = “cdrom-raw”
ide1:0.autodetect = “TRUE”
floppy0.present = “FALSE”
ethernet0.present = “TRUE”
usb.present = “TRUE”
sound.present = “TRUE”
sound.virtualDev = “es1371″
displayName = “Windows XP Pro”
guestOS = “winXPPro”
nvram = “WindowsXPPro.nvram”
MemTrimRate = “-1″ide0:0.redo = “”
ethernet0.addressType = “generated”
uuid.location = “56 4d 5c cc 3d 4a 43 29-55 89 5c 28 1e 7e 06 58″
uuid.bios = “56 4d 5c cc 3d 4a 43 29-55 89 5c 28 1e 7e 06 58″
ethernet0.generatedAddress = “00:0c:29:7e:06:58″
ethernet0.generatedAddressOffset = “0″tools.syncTime = “TRUE”
ide1:0.startConnected = “TRUE”uuid.action = “create”
checkpoint.vmState = “”
Change the guestOS value to “windows2000pro” and the other WinXPPro values to Win2000 (the rest are just names so they dont matter as much).
Also, these .vmx files are optimized for computers with only 256mb of ram which is why “memsize” equals 64. If you are running 512mb of ram then you might want to set this value to 128 for added performance.
If you would like to customize the size of the .vdmk files. Download Qemu located here and install it to a location such as “c:\program files\qemu”.
Goto Start > Run and type CMD.
In the command window, while in the qemu directory (eg, c:\program files\qemu>) type:
qemu-img.exe create -f vmdk WindowsXPPro.vmdk 13G
Replace the 13G with whatever file size you want the VM partition to be (in this case, 13 gig) and it will create it in your qemu directory. You might want to move this out of this directory. Now all if you have to do is repeat the steps in this article using your own .vmdk and .vmx files and you have a custom Virtual Machine.
0 comments:
Post a Comment